Onko iPhonessa liian monta korkealaatuista kuvaa, koska iPhonesta tulee hieno valokuvaamisen apuväline sisäänrakennetun iSight-kameransa ansiosta? Sitten kannattaa ehkä kopioida ja siirtää useita tai kaikkia valokuvia iPhonesta Windows PC: hen. Kuinka siirtää valokuvia iPhonesta tietokoneelle? Kuinka voit viedä iPhone-valokuvia helposti ja tallentaa ne tietokoneellesi? Tässä artikkelissa esitetään useita tehokkaita tapoja siirtää valokuvia iPhonesta tietokoneelle Windows 7/8/10 / Vista / XP -käyttöjärjestelmälle.
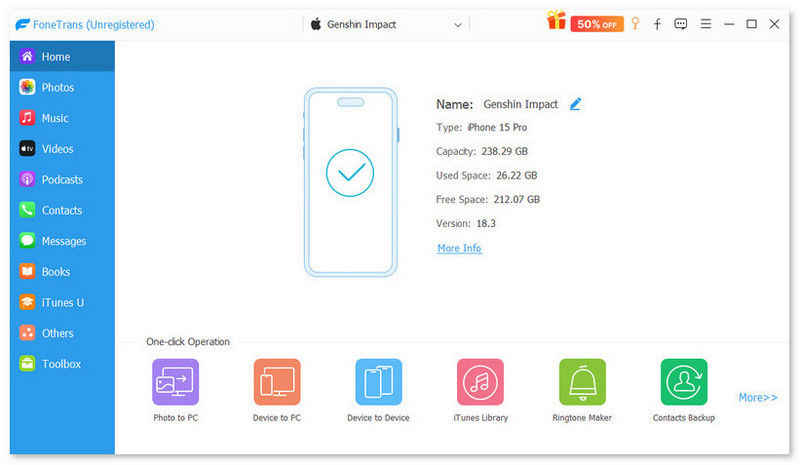
- FoneTrans Käytämme tässä tehokasta iPhone Photos Transfer -ohjelmistoa, joka voi säästää paljon aikaa, kun haluat siirtää iPhone-valokuvasi tietokoneeseen. Se on erittäin yhteensopiva Windows-käyttöjärjestelmien, kuten Windows 7, Windows 8, Windows 10, Windows XP ja Windows Vista, ja kaikkien iPhone-mallien kanssa, mukaan lukien iPhone X, iPhone 8/8 Plus, iPhone 7 / 7Plus, iPhone 6 / 6s / 5 / 5s. / 5c / 4s / 4 / SE. FoneTrans voi auttaa sinua tuomaan iPhone-valokuvia tietokoneelle helposti, riippumatta siitä, haluatko synkronoida kaikki iPhone-valokuvat tai vain tietyt valokuvat tietokoneellesi. Lataa ensin ja asenna ohjelma ja katso miten se toimii iPhonen valokuvien siirtämisessä.
1. Asenna FoneTrans ja kytke iPhone
Käynnistä FoneTrans ja liitä iPhone tietokoneeseen USB-kaapelilla. Pian laite havaitaan. Sovellusliittymä näyttää iPhonen tyypin, kapasiteetin, iOS-version, sarjanumeron ja muut seuraavat:
2. Valitse valokuvat, jotka haluat tuoda tietokoneelle
Valitse Valokuvat vasemmassa valikossa. Sitten kaikki valokuvasi pitävät Kamerarulla, valokuvavirta (valokuvat synkronoidaan iCloud-palvelimeen), Panoraamakuvat, videot, valokuvakirjasto (valokuvat synkronoidaan tietokoneesta) ja iPhonen muiden sovellusten jne. kuvat näkyvät päärajapinnassa. Valitse tietyt valokuvat, jotka haluat tuoda tietokoneelle, tai voit siirtää kaikki valokuvat iPhonesta tietokoneelle valitsemalla kaikki valokuvat.

3. Aloita iPhone-valokuvien siirtäminen tietokoneelle
Kun olet valinnut valokuvat, napsauta ylävalikossa Vie kohteeseen> Vie tietokoneeseen -painiketta. Valitse tietokoneesi kohdekansio ja napsauta OK. Pikaisesti kaikki valitut iPhone-kuvat synkronoidaan iPhonesta tietokoneellesi määritettyyn kansioon.
FoneTrans tarjoaa valokuvien siirtämisen iPhonesta Windows 10/8/7 -sovellukselle myös monia muita toimintoja, kuten synkronoida iPhone, iPod- tai iPad-tiedostot (tekstiviestit, yhteystiedot, muistiinpanot, multimedia) tietokoneellesi tai Maciin, viemällä ne tietokoneeseen tai iTunesiin varmuuskopioina ja vaihtamalla tietoja iOS-laitteiden välillä. Se on täysin tuettu iOS 12/11/10/9/8/7.
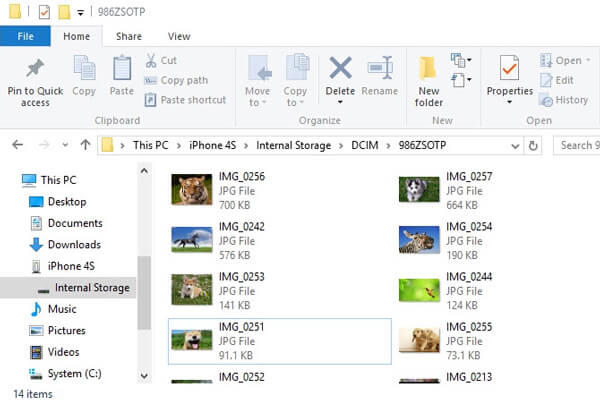
File Explorer on Windows PC: n sisäänrakennettu toiminto, jota voit tarkastella ja käyttää hallita laitteidesi tiedostoja ja ajaa. Sen avulla voit katsella kaikkia iPhonen valokuvia ja purkaa yksittäisen kuvan iPhonesta tietokoneelle. Koska se tukee vain Camera Roll -valokuvien siirtämistä iPhonesta tietokoneelle, joudut ehkä käyttämään menetelmää 1 kaikkien valokuvien siirtämiseen (mukaan lukien Camera Roll -kuvat, My Photo Stream, iCloud-valokuvien jakaminen, synkronoidut valokuvat tietokoneesta jne.). ) iPhonesta tietokoneeseen.
1. Liitä iPhone Windows-tietokoneeseen.
2. Windows 7: n "Tietokone" tai Windows 8/10: n "Tämä tietokone" -kohdassa sinun pitäisi nähdä iPhone asemana. Kaksoisnapsauta iPhone-asema> "Sisäinen tallennustila"> "DCIM", kaikki valokuvat ja videot iPhonen kamerakierrosta ovat täällä.
3. Voit selata kuvakansiossa iPhonen valokuvia ja videoita (mukaan lukien iPhonen näyttökuvat). Sitten voit valita valokuvat iPhonellasi ja siirtää ne tietokoneen Windows 7/8/10 -paikkaan haluamaasi sijaintiin kopioimalla ja liittämällä.
Voit tuoda valokuvia iPhonesta tietokoneellesi kytkemällä laitteen tietokoneeseen ja käyttämällä Windows Photo Gallery -sovellusta. Varmista, että sinä sinulla on uusin iTunes-versio tietokoneellasi. Valokuvien tuominen tietokoneeseen vaatii iTunes 12.5.1 tai uudemman. Kytke iPhone tietokoneeseesi USB-kaapelilla ja avaa iPhone avauskoodin avulla. Napauta Luotta tai Salli jatkaa, jos iOS-laite pyytää sinua luottamaan tähän tietokoneeseen -ikkuna aukeaa.
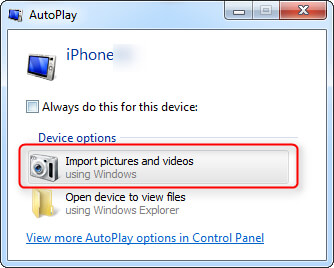
1. Kytke iPhone tietokoneeseen USB-kaapelilla. Valitse "Tuo kuvia ja videoita Windowsin avulla", kun automaattisen toiston ikkuna tulee näkyviin työpöydälle. Jos automaattisen toiston ikkuna ei tule näkyviin, siirry kohtaan "Tietokone" ja napsauta hiiren oikealla painikkeella iPhone-laitetta. Valitse "Tuo kuvia ja videoita".
2. Valitse "Tuo asetukset" -linkki ja napsauta "Tuo kuvat" -kohdan vieressä olevaa "Selaa" -painiketta valitaksesi kohde.
3. Napsauta "OK" tuodaksesi kuvia tietokoneesta.

1. Kytke iPhone Windows 8 -tietokoneeseen.
2. Kirjoita "PC" ja napsauta hiiren kakkospainikkeella iPhone-laitetta valitaksesi "Tuo kuvia ja videoita".
3. Valitse "Tarkastele, järjestä ja ryhmitä tuotavia kohteita", kun tuot iPhone-kuvia ensimmäistä kertaa. Tai paina "Tuo kaikki uudet tuotteet nyt", jos olet tuonut valokuvia iPhonestasi. Napsauta sitten Seuraava.
4. "Lisää vaihtoehto" -linkki voi auttaa sinua valitsemaan kansion, johon haluat tuoda kuvia ja videoita iPhonesta. Napsauta "OK" ja sitten "Seuraava" -painiketta valittuasi kansion.
5. Valitse siirrettävät valokuvat ja napsauta "Tuo" -painiketta.
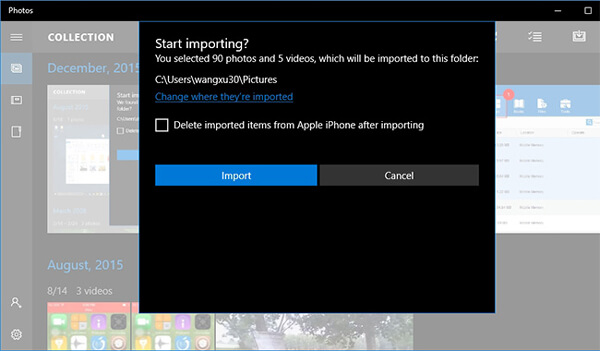
Microsoftin lisäämä Photos-sovellus antaa käyttäjille mahdollisuuden siirtää valokuvia helposti iPhonesta Windows 10 -tietokoneeseen.
1. Kytke iPhone Windows 10: een USB-kaapelilla ja käynnistä Photos-sovellus tietokoneella.

2. Paina "Tuo" -painiketta Valokuvat-käyttöliittymän oikeassa yläkulmassa. Valitse tuotavat kuvat ja napsauta "Tuo" siirtääksesi kuvia iPhonesta Windows 10: ään.
Ehkä saatat olla kiinnostunut: Kuinka poistaa valokuvien synkronointi iPhonesta helposti
ICloud Photo Library -sovelluksen avulla voit käyttää valokuvia iPhonelta ja PC: ltä helposti, koska viimeisimmät kuvat lisätään automaattisesti iCloud Photo Libraryyn ja kaikki tekemäsi muutokset ja muokkaukset pidetään ajan tasalla iPhonessa ja tietokoneessa. Jos haluat aktivoida iCloud Photo Library -sovelluksen, sinun on määritettävä iCloud for Windows tietokoneellesi ja varmistettava, että iPhonesi on kytketty langattomaan verkkoon.
1. Käynnistä iCloud Photo Library. Lataa ja asenna iCloud for Windows tietokoneellesi. Napsauta Valokuvien vieressä Valinnat> iCloud-valokuvakirjasto> Valmis> Käytä. (Valokuvat eivät ehkä synkronoidu iCloudiin)
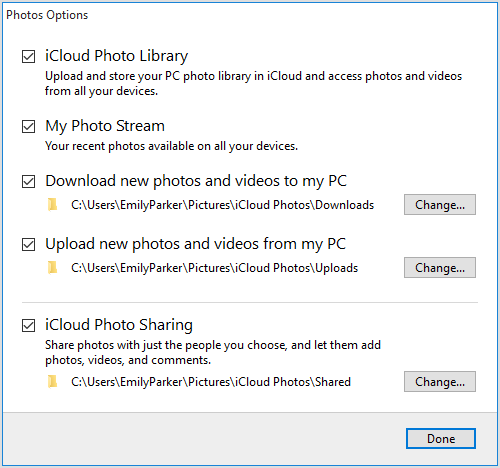
2. Koska iCloud Photo Libraryyn lisäämäsi uudet valokuvat iPhonesta latautuvat automaattisesti tietokoneellesi, voit ladata valokuvat myös manuaalisesti. Avaa vain File Explorer -ikkuna ja napsauta Suosikit-kohdassa iCloud Photos. Napsauta Lataa valokuvia ja videoita, valitse valokuvat ja videot, jotka haluat ladata iPhonesta tietokoneelle, ja napsauta Lataa.
Napsauta tätä saadaksesi lisätietoja aiheesta Siirrä Android Photos iPhoneen.
Tässä artikkelissa esitellään neljä tehokasta tapaa siirtää valokuvia iPhonesta tietokoneelle. Suositeltuin tapa olisi käyttää FoneTrans-ohjelmaa, koska vain FoneTrans voi auttaa siirtämään kaikenlaisia valokuva-albumeja ja viemään kaikki iPhone-valokuvat tietokoneelle yhdellä napsautuksella. Riippumatta siitä, käytätkö iPhone 4/5/6/7 tai uusinta iPhone X: ää ja iPhone 8: ta, FoneTrans olisi silti paras kumppani synkronoimaan iPhone-valokuvat tietokoneeseen. Toivottavasti tämä artikkeli voi auttaa sinua, kun haluat Tuo iPhone-valokuvat tietokoneeseen Windows 7 / 8 / 10.
Mitä mieltä olet tästä viestistä?
Erinomainen
Arvostelu: 4.9 / 5 (perustuu 159-äänestyksiin)

29. syyskuuta 2018 10:30 / Päivittänyt Louisa Valkoinen että Siirrä iOS-tietoja, Kuva
 Kuvien siirtäminen iPhonesta Maciin
Kuinka siirtää valokuvia iPhonesta Maciin? Tämä artikkeli antaa sinulle vinkkejä.
 Valokuvien siirtäminen iPhonesta iPhoneen
Haluatko siirtää valokuvia kahden iPhonen välillä? Sitten tämä viesti voi auttaa sinua.
 Kuinka siirtää yhteystietoja, musiikkia, kuvia kuolleesta iPhonesta uuteen iPhoneen
Tässä artikkelissa kuvaillaan tietojen siirtämistä kuolleesta iPhonesta uuteen iPhoneen.

